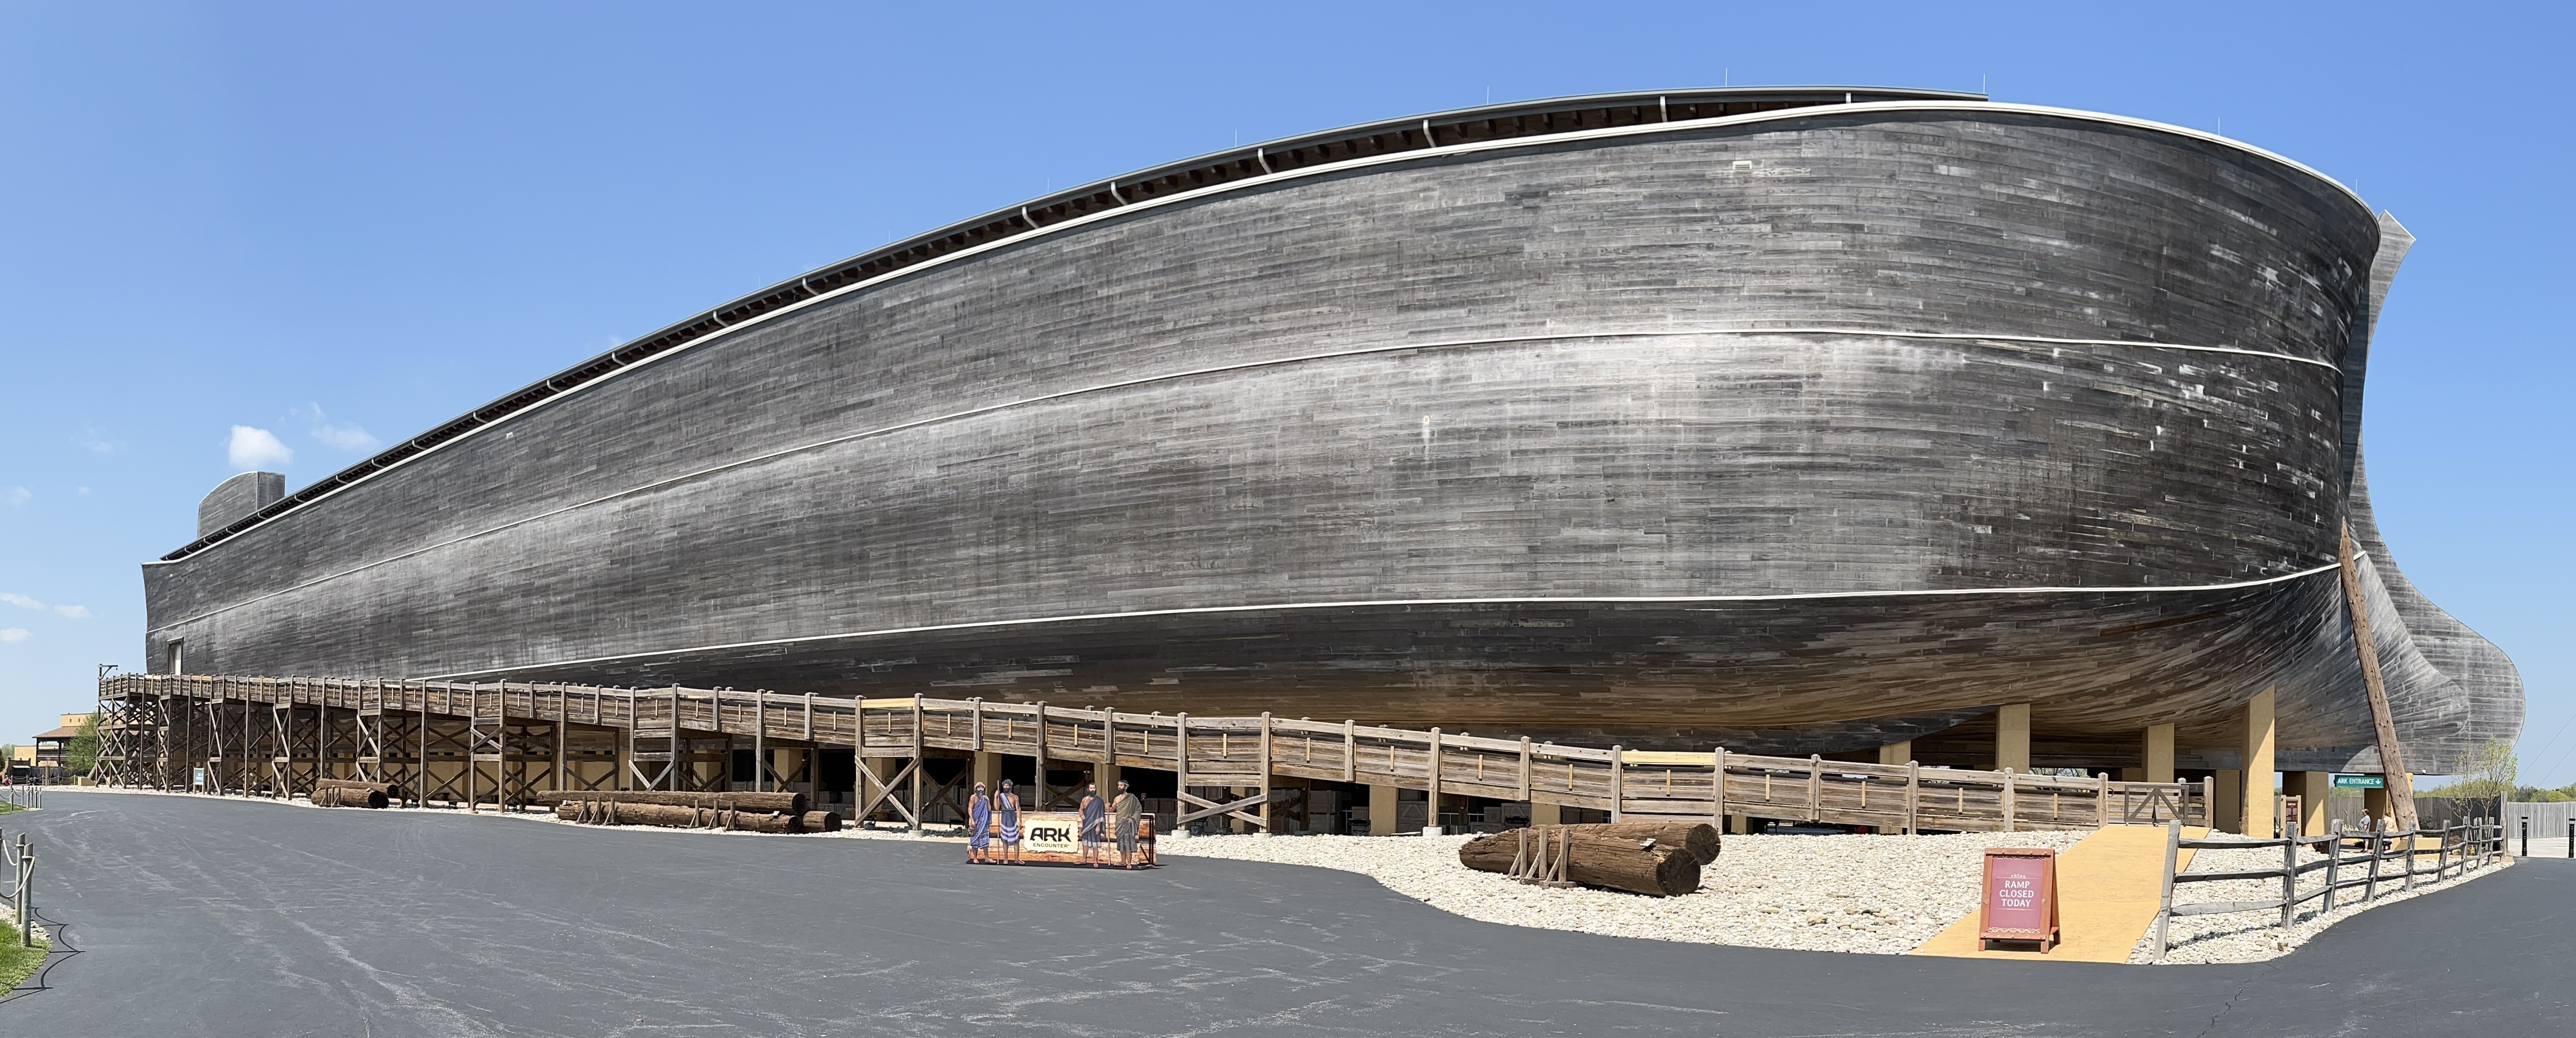
Monday, June 17, 2013

Owl Pellet Party

*Warning: if you are easily grossed out, you might not want to read this. But, now that your curiosity is peeked, why don't you just go for it? It's not that bad, really. I promise!
 

A couple months back, my friend asked me if I wanted to have an owl pellet dissection party for our kids. I first had to ask what in the world an owl pellet was and when she informed me that it was owl puke I thought, "Uh, why not??" All in the name of science, right?!
 
I had no idea that owls generally swallow their prey whole and then regurgitate the fur and bones into these lovely little balls. Oh joy.
  
So let me tell you about our party. It started off just about right for this city girl. I can definitely handle having the kids color and make bug jars, which they really enjoyed.


But from there, well, it was time to pull on your rubber gloves folks and get busy dissecting! In the picture below, there are three owl pellets on the tray. The rest were bones that they found for the kids to look at. The older kids did a great job dissecting each owl pellet and then trying to figure out what the bones were or what animal they came from.


Carter trying to match up the bones.


Carter and his friend working on an owl pellet
 
When I first started working on a pellet with my daughter I was slightly grossed out, but got over it soon enough and we were able to discover a lovely little skull in the midst of the fur. The kids recorded their data on these cute owl pellet lab sheets.


I cannot take any credit whatsoever for this party. My friend did all of the work, but we were very appreciative! She showed the kids a picture of the actual owl that the pellets came from and they watched a video about an owl expelling a pellet. (I know, you're so sorry you missed that.)


We ate lunch before all the science activities came into play and this is what we had. Pretty cute, huh?? Pinterest has so many awesome ideas out there and once again came through for us. (My friend and I have this slight obsession with making even the food a part of the theme.)
 
 
And my awesome friend pulled together these cute flowers in dirt cakes for dessert. We also made Owl S'mores, but I didn't get a picture of those but you can see what they are like as well get some other owl themed ideas from the party I did for one of our children's birthday parties.
 
 
After all of that we headed out for a nature hike. Each child had a clipboard with a checklist of things to look for in the woods and they each got a bug net. TOO FUN!


Carlee working hard checking off things on her nature scavenger hunt checklist.


Some of the Gang!


Something I had never seen before while on our walk. Beautiful!


So there you have it. We survived our first owl pellet dissection party and we had a great time! Any suggestions for another science themed party?
 
Thanks so much for visiting Purposeful Homemaking. Please take a moment to "Like" me on Facebook, follow me on Twitter and Pinterest or stay connected with Google Friend Connect so you don't miss a thing!
 

********************************************************************************************************

Current Sponsors
 
While these companies are not in direct support of this sponsored post, I am blessed to have them on Purposeful Homemaking. Please take a minute to check out their links.


Interested in adding your name to the list? Check out my advertising policies.

  • Halifax ISA-Individual Savings Accounts
  • Usborne Books-excellent books for children of every age
  • drinkmamatea-teas for Preconception, Pregnancy, After Delivery and Nursing
  • doTerra-certified pure, therapeutic-grade essential oils
 

Wednesday, June 12, 2013

Gardening Tips (Archived)

Work With What You Have

We do not have a great space for our garden, but we make do with what we have. For us, that means it needs to be alongside our children's large sandbox because there really is no other place for it.


Because of our smaller area, we chose to go with Square Foot Gardening. This is obviously great for small spaces and can still have a high yield. Last year our garden was about 10x10 ft and this year we are expanding it to 10x20 ft.

But, if you don't have the desire to plant a whole garden or just simply don't have the space (perhaps you live in an apartment), you can at least consider planting one plant in a container or a tiny herb garden in your kitchen. As long as you do something it will be better for you and your family than if you did nothing.

Keep Records

If you keep records of your gardening, it will help you immensely the following year. Last summer, I sketched a scale of the garden and noted what we planted, where and how many of each plant.

The placement will come in handy for crop rotation. Especially for things like tomatoes and potatoes. If you rotate them, not only will it help specific soil nutrients to not become depleted, it will also help keep pests at bay, such as the potato bug that will be down in the ground just wating for next years batch of potatoes. But, you're too smart for that and your potatoes will be somewhere else. :)

I also kept track (as much as possible) of what our yield was for each vegetable. For example, the number of quarts of green beans (or in my case 1/2 quarts since we didn't plant enough) that I froze and the number of tomatoes we canned. That way, as we eat these vegetables during the winter, I can see where we end up and will know if we need to plant more or less of that particular produce.

Resources

Those that have gardened for awhile are probably your best resource. My husband loves getting gardening tips from family members that have been at it much longer than us. Those old timers especially, have a lot of good tips!

What We Learned From Last year
  • If your expecting a frost, simply use a tarp over your garden to help keep those plants going.
  • if you need to pick your green tomatoes at the end of the season because it's getting too cold for them to ripen, put them in a paper bag in your home. It'll take a couple weeks, but they will ripen. I did scores of tomatoes this way last fall.
  • buy tomato plants that are specific for containers. Otherwise they will not produce healthy tomatoes.
  • rotate the placement of your tomatoes and potatoes from year to year to help reduce pests
  • when dealing with a pesky rabbit or two, it might help to scatter hair clippings throughout the garden or to put soap shavings around the ede of the garden. Marigolds are also supposed to help (and if nothing else, they make the garden look prettier!) However, they are an added expense so the kids and I harvested the seeds from last year to plant this year. We hope to start them indoors and then transplant them to the garden.
Do you garden? If so, do you have your garden in? If you don't garden, do you think you might give it a try?


Thanks so much for visiting Purposeful Homemaking. Please take a moment to "Like" me on Facebook, follow me on Twitter and Pinterest or stay connected with Google Friend Connect so you don't miss a thing!

********************************************************************************************************

Current Sponsors
While these companies are not in direct support of this sponsored post, I am blessed to have them on Purposeful Homemaking. Please take a minute to check out their links.
Interested in adding your name to the list? Check out my advertising policies.

  • Halifax ISA-Individual Savings Accounts
  • Usborne Books-excellent books for children of every age
  • drinkmamatea-teas for Preconception, Pregnancy, After Delivery and Nursing
  • doTerra-certified pure, therapeutic-grade essential oils

Monday, June 10, 2013

All About Spelling {Review}


If you're looking for homeschool curriculum for the fall, or perhaps just want to help your child hone in on his spelling skills over the summer, then you might want to check out All About Spelling from the All About Learning Press. All About Learning provides complete Reading and Spelling curriculums based on the Orton-Gillingham approach and the latest research.

Marie Rippel developed these two in-depth programs as a result of her own son's struggles with reading and spelling. You can read her full story here and for my review of All About Reading, click here.
What We Reviewed
The All About Spelling program includes seven levels and we reviewed the Level 1 Materials as well as the Deluxe Interactive Kit. This spelling program uses a Multisensory approach to lessons by using sight, sound, and touch. There is continual review throughout the program and only one concept is taught at a time and is mastery based.
All About Spelling Deluxe Interactive Kit
 
This program uses letter tiles, flashcards and more to give your child a hands-on approach to spelling. It is anything but a "here's your list of spelling words for you to write out each day and I'll quiz you on Friday" type approach. Instead, it is a parent/teacher directed program that requires interaction with your child and about 10-20 minutes per day.
The Lesson Plans are clearly laid out and are the "open and go" approach which is nice. They are easy to follow and you'll know exactly what you need to do each day. You can Download Sample Lesson Plans here: Level 1, Level 2, Level 3, Level 4, Level 5, Level 6, Level 7
 
The All About Spelling Program

All About Spelling is mastery-based so it allows your child to learn at his own pace. This program is appropriate for beginners and struggling learners and in my opinion, for anyone who wants to make sure their child has an excellent spelling foundation. Each concept is reviewed frequently so a child will not forget what he has been taught. This article may help you decide if All About Spelling is right for your situation.
 
Well-organized lesson plans
 
How We Used The Program
I wanted to try a program like this because while our children didn't necessarily struggle with spelling, I felt that our former program did not teach spelling skills adequately. I wanted to make sure that our children had a good phonics base, as well as the skills necessary to spell more difficult words down the road.


For that reason, I spoke with a consultant from All About Learning and was advised that anyone new to the program start their child on Level 1 regardless of their age or grade level. That being said, our two older children both started on Level 1 a few months back.
While I can't say that we are loving the program, I feel that it is worth sticking with because of the skills that are taught. And, to help encourage our children I chose to set a timer for 10 minutes for each lesson and covered what we could during that amount of time rather than trying to complete a lesson in one sitting. I'm hoping that as we progress, our children will enjoy it a bit more. I feel that their lack of enthusiasm towards the program is stemming from the fact that they find it easy and repetitive. That being said, we will still continue to use this program in the fall and see how we're doing then.
 
Satisfaction Guaranteed

If you purchase the materials and are not fully satisfied, All About Learning allows you to return the materials for a full refund up to a year later. 
 
I hope you found this review of All About Spelling to be helpful!

Thanks so much for visiting Purposeful Homemaking. Please take a moment to "Like" me on Facebook, follow me on Twitter and Pinterest or stay connected with Google Friend Connect so you don't miss a thing!
 

********************************************************************************************************
Current Sponsors
 
While these companies are not in direct support of this sponsored post, I am blessed to have them on Purposeful Homemaking. Please take a minute to check out their links.
Interested in adding your name to the list? Check out my advertising policies.
  • Halifax ISA-Individual Savings Accounts
  • Usborne Books-excellent books for children of every age
  • drinkmamatea-teas for Preconception, Pregnancy, After Delivery and Nursing
  • doTerra-certified pure, therapeutic-grade essential oils
Purposeful Homemaking received one or more products mentioned in this post at no cost in order to conduct a thorough and honest review. All opinions expressed are my own. Additionally, this post may contain affiliate links for which I will earn compensation should you choose to make a purchase. I am disclosing this information in accordance with the Federal Trade Commission’s 16 CFR Part 255, Guides Concerning the Use of Endorsements and Testimonials in Advertising. Thank you for your support of Purposeful Homemaking.

Wednesday, June 5, 2013

Arden Companies Outdoor Patio Cushions {Review}


I absolutely love spring and summer and during those times of year, one of my favorite things to do is to eat a meal with my family out on our patio. I love being outdoors and sharing a meal with the people I love most. We have worked hard over the years on our yard to improve it's aesthetic qualities (although we have a ways to go!) and one thing that is a blessing is beautiful, comfortable cushions to sit on at our patio table.


I recently reviewed a set of 4 cushions from Arden Companies, a manufacturer of outdoor products for retailers including Lowes, Walmart, Meijer and numerous other stores.

We reviewed their Classic Collection Peekaboo Patio Chair Cushion and are very pleased with them. Created by for LIVING, each cushion measures 44"x21" and is made from a polyester-olefin blend that resists fading. Made in the USA, each cushion retails for $39.99.

Here's a peak at some of the features we love most about these cushions:
  • They are padded perfectly. In fact, they are about twice the depth of my former cushions. This makes for a comfortable and relaxing place to sit.
  • I love, love, love the pattern of the cushions, as well as the detail on the upper portion of each cushion. Having the slightly gathered look with a button in the middle certainly adds class to the cushions.


  • Each tie on the cushion is a perfect length. On our former cushions they were a tad too short which made tying them a bit more difficult.

I couldn't be happier with these cushions and I'm sure you'd feel the same way. I love dreaming about ideas for our back yard and patio area so if you'd like some inspiration as well, be sure to check out Arden's Bombay Outdoors website for garden ideas and outdoor entertainment ideas.


Thanks so much for visiting Purposeful Homemaking. Please take a moment to "Like" me on Facebook, follow me on Twitter and Pinterest or stay connected with Google Friend Connect so you don't miss a thing!

********************************************************************************************************

Current Sponsors

While these companies are not in direct support of this sponsored post, I am blessed to have them on Purposeful Homemaking. Please take a minute to check out their links.
Interested in adding your name to the list? Check out my advertising policies.
Purposeful Homemaking received one or more products mentioned in this post at no cost in order to conduct a thorough and honest review. All opinions expressed are my own. Additionally, this post may contain affiliate links for which I will earn compensation should you choose to make a purchase. I am disclosing this information in accordance with the Federal Trade Commission’s 16 CFR Part 255, Guides Concerning the Use of Endorsements and Testimonials in Advertising. Thank you for your support of Purposeful Homemaking.

Monday, June 3, 2013

Lavender Essential Oil: A Must-Have for Summer!


There are so many Essential Oils that I love, but the one we are going through like crazy right now is Lavender. With warmer weather here, well, some days that is, depending on where you live (I have used the heat and the air conditioning in the same week on more than one occasion this spring. Crazy!!) the bugs come out and so do the allergies.

Insect Repellent and Insect Bite Relief

Lavender has been awesome to have on hand to help repel insects (Especially the "no-see-'ems" as we call them. They are awful! You don't see them, but when they bite it looks like a bee sting and hurts and itches, sometimes for several days at a time, and you usually swell quite a bit around that area. These nasty insects go for the back of the neck and hair line.) Well, once those awful insects started biting the kids, I got my arsenal of Lavender out to put on their neck and hair lines before they headed out to play and, as far as I know, they have not been bitten once since I started applying it beforehand.


If you have been bit, especially by a mosquito, Lavender also works well to help stop the itching. The fact that Lavender is an anti-histamine, is anti-infectious and anti-inflammatory means it definitely helps cover the bases when it comes to itchy, swelling bug bites that sometimes get infected.

Lavender happens to be doTERRA's most popular oil and I can see why. There is quite a long list of common primary uses for this oil including: anxiety, blisters, burns, cancer, diaper rash, fever, hyperactivity, insomnia (I can attest that it helps tremendously if you're having difficulty sleeping), mastitis, rheumatoid arthritis, stretch marks, sunburn, wrinkles, and more!) It can be used topically, aromatically, or for dietary use and is safe to use during pregnancy.

Allergies

Lavender is also very helpful to have on hand if you are dealing with allergies (another reason why we've been using it up these days!). It is a natural antihistamine and for those of us who have been dealing with seasonal allergies this year, I apply it on the bottom of the feet (the quickest way to get an oil into your system), the chest, on the back of the neck and on the sinuses. It has brought a lot of relief to those of us who have had to use it.

Recently I read the back of a Benadryl bottle and was disappointed (yet not surprised) to read that it contains D and C red #33, FD and C red #40 and HFCS. While we don't avoid these ingredients at all cost, (although we should!) I do try to limit the number of dyes our children consume. That being said, I'd much rather grab my bottle of Lavender instead of the Benadryl. 

doTERRA's Lavender Essential Oil can be applied without dilution, and like all of doTERRA's oils, it is Certified Pure Therapeutic Grade. That means that these are extremely safe oils and some of them can even be consumed orally, however, I can't speak for other brands of essential oils and I wouldn't recommend consuming them. For allergies or other issues, simply dilute one drop of Lavender oil in 1 tsp of honey or in 4 oz. of a beverage. However, it is not to be consumed (although it is perfectly safe to apply topically undiluted) by children under 6 years of age and you should dilute it even more for children over 6.

Sun Care

For a natural sunscreen, add 1 drop of Lavender for every 1-2 T of coconut oil. Rub into the skin and allow it to soak in before going out.

If you already got burned, add 2-3 drops of oil to 1 oz of water in a spray bottle, shake well and mist on the burn.


There are so many uses for Lavender and it's one I definitely want to keep on hand for taking care of my family. To order your own, click here (simply scroll down until you come to Lavender). If you want to start getting your oils with a wholesale discount, contact me or click here for more information about doTERRA's oils.

Thanks so much for visiting Purposeful Homemaking. Please take a moment to "Like" me on Facebook, follow me on Twitter and Pinterest or stay connected with Google Friend Connect so you don't miss a thing!


********************************************************************************************************

Current Sponsors

I am blessed to have the support of these companies on Purposeful Homemaking. Please take a minute to check out their links. Interested in adding your name to the list? Check out my advertising policies.

Related Posts Plugin for WordPress, Blogger...